Meet Claudette and Josephine. Our oldest daughter and her fiancé gifted me with these adorable sweeties for Mother's Day. They are Sablepoots or "Booted Bantams." They are so cute and tiny. We are slowly acclimating them to our coop. I have always wanted a chicken like these, small and mille fleur colored. Mille Fleur translates to thousand flowers (the white in their feathers looks like LOTS of flowers). I thought all chickens like this were Mille Fleur d'Uccles, but I learned about the Sablepoot after I was told they were Booted Bantams. They are supposed to be good mommas so hopefully, they will sit eggs for me!
Speaking of eggs, here is our first banty egg! I was so excited. Glad they are settling in and feeling safe enough to lay an egg. I'm sure you will see more about them in future posts. A nice bright spot in the middle of all this Covid19 mess. Hope you are all staying safe and well.
Disclaimer:
I received a FREE kit of this product through the HOMESCHOOL REVIEW
CREW in exchange for my honest review. I was not required to write a
positive review nor was I compensated in any other way.
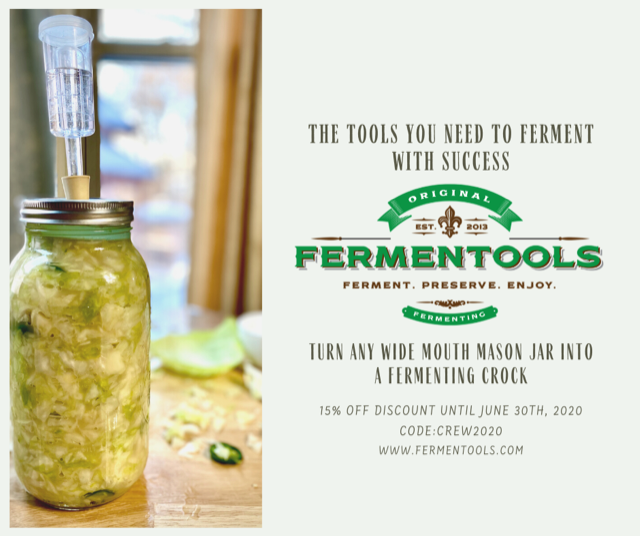
Could there have been a more perfect product for me to review? I am a homesteader at heart and love all things preserved. I just couldn't pass up the chance to review the Starter Kit from Fermentools. I have been canning for years, but just tried fermenting last year. If you don't know about fermenting or the awesome benefits of the product I urge you to do some research. In an age where gut health is key, you definitely want to consider fermented foods. There is a plethora of information about the benefits of fermentation, but it can be summed up for the most part in one word, probiotics. Healthy gut bacteria.
The Starter Kit includes most of what you need to get started fermenting. You just need to supply a wide mouth mason jar and metal ring. Included in the starter kit is:
stainless steel lid
glass fermentation weight
airlock system
rubber stoppers
rubber gasket
Himalayan powdered salt
I prefer to preserve our own homegrown foods from our garden but the season isn't right yet for most foods. I tried fermenting cucumbers and cabbage last year with no special equipment so I knew I could easily ferment cabbage. If you have never tried fermenting before, I urge you to try it. It is quite simple and this kit makes it just about foolproof and easy to do. If you are worried about spoilage, botulism, or other scary bacteria, you shouldn't. While not impossible, if you follow directions, use filtered (non-chlorinated) water, and use clean utensils there should not be much chance of bad bacteria. It just doesn't survive in the salt solution environment.
Green cabbage sauerkraut
Purple cabbage sauerkraut
To keep it simple, you basically choose something to ferment, follow a recipe, add the food you chose to ferment into a clean mason jar (not included in the starter kit), fill the jar with filtered water with salt dissolved (follow directions for the % salt solution--for cabbage and some foods you add the salt directly to the food as part of the process), place glass weight so that it keeps food submerged under the water, place gasket on the jar, place stainless steel lid on top of gasket, screw metal ring (not included in kit) on to seal the jar, put rubber stopper with a hole in it into the hole in the middle of the lid, fill the airlock system halfway with filtered water and place it into the hole in the rubber stopper. That's it, it takes minutes to complete. The hard part is the waiting!
Included guide with instructions and recipe
It can take anywhere from 3 days to weeks to ferment different foods. I think it took about 10 days or so last year to make fermented pickles. Oh my goodness, they were awesome! The cabbage to make sauerkraut turned out pretty good. This kit made it pretty easy because it has a chart that tells you how to mix the salt and the water for the right solution. The chart covers solutions for 2%, 3.5%, and 10% solutions. There is a simple recipe included for sauerkraut in the included guide and plenty more available on their website (https://www.fermentools.com).
Chart is in grams, conversion to tsp/Tbsp is on the other side of the bag
Recipes available on their website
Practice makes perfect. I am learning that the more you do, the easier it gets and the more creative you can become. I am currently fermenting garlic asparagus (fresh from our garden!). I can't wait to try it. If it is anything like the pickles from last year it will be superb!
Current ferment of garlic asparagus
I couldn't get the glass weight to seat properly on top of the asparagus
All in all, I really liked this kit and plan to purchase more. It made fermenting so much better. I had to manually burb my jars last year and they leaked and made a mess. With the airlock system, no burping, and no mess! When I did the asparagus the weight didn't want to sit correctly so I wasn't happy with that but hopefully it will be ok. It seems the weight needs to be slightly larger? It would also be nice to have a "handle" or something that makes it easier to pick up out of the jar (I have seen knobs and/or indents on others I have seen). With that being said, I still recommend this Starter Kit. Now is the time to buy with their current sale and the 15% coupon (CREW2020) good through June 30, 2020 below! Be sure to take advantage of this great offer.
You can connect with Fermentools on FACEBOOK, INSTAGRAM, and PINTEREST. Please be sure to check out the other reviews from my fellow Crew members to see what they have to say about this awesome system by clicking on the graphic link below.
Disclaimer:
I received a FREE copy of this product through the HOMESCHOOL REVIEW
CREW in exchange for my honest review. I was not required to write a
positive review nor was I compensated in any other way.
My oldest is dyslexic (you wouldn't hardly know it now), dysgraphic, and couldn't read until the end of 2nd grade. My youngest was reading in kindergarten and is an avid reader and good speller. Both of my kids always need handwriting practice. I was glad to be able to review the Perfect Reading, Beautiful Handwriting ebook (The Intelligent Parent's Complete Step-by-Step Program for Teaching Any Child How to Read & Write in 60 Days!) by Caroline Joy Adams from Everyday Education, LLC. It can be used for ages 4 to adult.
Italics uses fewer strokes and is more fluid for the writer
It uses italic style handwriting which uses fewer strokes to write. I received a digital copy of this 215-page ebook. I was able to easily download it and print it out. I chose to bind it in my binding machine to keep it neat and usable for Little Bug. It is a consumable book and is not in digital format to be shared or copied except for those pages listed as reproducible in the Table of Contents for your own family only.
Notice Chapter 2 has a reproducible guide sheet
I am using it with my 1st grader. Even though she can already read, she needs work on her handwriting! Even though Chapter 2 covers the alphabet, it is suggested to go over it to acquaint your child with the italic formation of the letters. Once they understand the simpler strokes you can move on to Chapter 6 for older students if necessary.
sample of the reproducible handwriting page
We went ahead and continued with Chapter 3 with lessons 2-23. She knows her short vowel sounds, consonant blends, plural words, and compound words that it covers, but she needs the writing practice. We could have just jumped to Chapter 6 but, she is only in 1st grade and though very advanced in reading, she still needs the content of the later lessons in the earlier chapters.
teaching suggestions from the foreword
The book includes a foreword, introduction, and 6 chapters that include 60 lessons and an entire chapter on handwriting practice (Chapter 6). The foreward includes how to teach the lessons and scheduling options. The introduction covers 4 ways to use the book (teaching young children to read and write, teaching children with reading difficulties to read effectively, teaching children to have fast, legible, attractive handwriting, and teaching yourself beautiful handwriting). Daily use is best but for the younger ones it is not necessary to complete an entire lesson at once. We use it daily for handwriting practice.
Little Bug working on a lesson
suggested scheduling option for younger student
If you use Model-Based Writing (ModelBasedWriting.com) there are suggestions and schedule options in the foreword. It's also important to say that this is definitely a Charlotte Mason based approach book. It is best to keep most lessons to only 10 to 15 minutes, especially for the younger ones.
A typical lesson in Chapters 3-5 (lessons 2-60) generally contains a list of words on the left side of the page and handwriting practice on the right side. The left side of words is based on what the lesson is covering (i.e. short vowel sounds, consonant blends, etc). The right side has sentences with blank spaces below each sentence for copywork practice. I REALLY like this. She doesn't have to flip pages back and forth or shuffle pages to do her copywork. She writes immediately below the sentence she is copying.
List of words
Copywork page with first word started in each line
Little Bugs completed page
Chapter 6 begins with simple copywork then advances to slanted letters with guides. Also included in Chapter 6 are:
Joining Letters Together
Using the Edged Pen
Adding Serifs (beginning and ending strokes to letters)
Variations (making letters fancier)
Joining letters
Practicing slant
Sample serifs
I wasn't sure when we first started but I am determined to continue this with Little Bug. I know it will help her handwriting once I can get her to follow the guides. She is so stubborn and wants to keep making the letters her own way. Time and maturity will help that. I did like the format and recommend that you check out Perfect Reading, Beautiful Handwriting ebookby Caroline Joy Adams. You can connect with Everyday Education, LLC. on FACEBOOK, TWITTER, INSTAGRAM, and PINTEREST. Also, be sure to check out what my fellow Crew members had to say about this by clicking on the graphic link below.